Hel-micro + npm私有仓库 + unpkg私有部署实现模块联邦的最佳实践
所谓工欲善其事,必先利其器(搭建环境)
npm私有仓库
一.原理
我们平时使用npm publish进行发布时,上传的仓库默认地址是npm,通过Verdaccio工具在本地新建一个仓库地址,再把本地的默认上传仓库地址切换到本地仓库地址即可。当npm install时没有找到本地的仓库,则Verdaccio默认配置中会从npm中央仓库下载。
二.常用的仓库地址
- npm : https://registry.npmjs.org/
- cnpm : http://r.cnpmjs.org/
- taobao: https://registry.npm.taobao.org/
三.优势
- 私密性高,仅团队共享。
- 安全性高,能够有效的防治恶意代码攻击。
- 使用局域网,传输速度快。
四.准备环境
兵马未动,粮草先行,既然是搭建私有仓库应用,基础环境得备好。
- node 14.19
- git
- verdaccio
- nrm(快速切换仓库源)
- pm2(守护进程)
五.使用verdaccio搭建私有npm服务
npm install -g verdaccio
- 运行。启动时间会很久,断开cmd会关掉服务,可以使用pm2守护进程即可。
// 访问http://localhost:4837
verdaccio
- 配置config.yaml,使局域网下能共享访问,否则只能本机访问。
// 最后面添加以下配置
listen: 0.0.0.0:4873
// 访问http://ip:port/
// 不要访问本地localhost下的
verdaccio
nrm add <registry> http://localhost:4873
nrm use <registry>
nrm ls
- 注册verdaccio账号,一定要先保证切换到本地的源仓库的前提下,因为你注册的账号是保存在对应仓库源上的。
npm adduser
// 输入账号和密码
// 登录
npm login
// 发布
npm publish
unpkg私有化部署
上一章节将npm搭建到服务器了,接下来就是要搭建unpkg cdn服务,并且将上一章节搭建的npm私有仓库连接到unpkg私服上
首先搭建unpkg私服
一.拉取unpkg源码
git clone https://github.com/mjackson/unpkg.git
# 安装依赖
$ npm i
在package.json的script添加start命令:
"scripts": {
    "build": "rollup -c",
    ...
    "watch": "rollup -c -w",
    "start":"set NODE_ENV=production&&node server.js"
  },
执行编译命令:
npm run build
命令运行完后会在根目录生成server.js文件;
启动服务:
npm run start
我们自己搭建的unpkg已经可以正常的使用了,但是目前我们私库的npm包还是不能访问,记下来就是添加私库支持了;
二.unpkg添加私库支持
根目录新建npmConfig.js来存放私库包的命名空间:
//存放私库包的命名空间
export const scopes = [
    '@cz','@syl'
];
/****
 * 私库地址,代理端口会解析url的端口号
 * const privateNpmRegistryURLArr = privateNpmRegistryURL.split(":");
 * const privateNpmPort = privateNpmRegistryURLArr[privateNpmRegistryURLArr.length - 1]
 * 拉取一些npm的包会返回302的情况,unpkg暂时没有处理,会不会和本地的npm源有关?
 ***/
export const privateNpmRegistryURL = 'http://10.250.4.121:8088';

//互联网npm地址
export const publicNpmRegistryURL = 'http://registry.npmjs.org';

export default scopes;
接下来就是修改修改modules/utils/npm.js文件了,思路大概如下:
- 私库地址为http,需要修改https为http;
- 设置我们私库的端口;
- 根据npmConfig.js中的scopes去匹配unpkg请求的包,如果是私库的包,就走内网的npm源,如果没有匹配到,就走互联网npm地址;
import url from 'url';
import http from 'http';
import gunzip from 'gunzip-maybe';
import LRUCache from 'lru-cache';

import bufferStream from './bufferStream.js';

const npmRegistryURL =
  'http://10.250.4.121:8088' || 'https://registry.npmjs.org';


const oneMegabyte = 1024 * 1024;
const oneSecond = 1000;
const oneMinute = oneSecond * 60;

const cache = new LRUCache({
  max: oneMegabyte * 40,
  length: Buffer.byteLength,
  maxAge: oneSecond
});

const notFound = '';

function get(options) {
  return new Promise((accept, reject) => {
    http.get(options, accept).on('error', reject);
  });
}

function isScopedPackageName(packageName) {
  return packageName.startsWith('@');
}

function encodePackageName(packageName) {
  return isScopedPackageName(packageName)
    ? `@${encodeURIComponent(packageName.substring(1))}`
    : encodeURIComponent(packageName);
}

async function fetchPackageInfo(packageName, log) {
  const name = encodePackageName(packageName);
  const infoURL = `${npmRegistryURL}/${name}`;

  log.debug('Fetching package info for %s from %s', packageName, infoURL);

  const { hostname, pathname,port } = url.parse(infoURL);
  const options = {
    hostname: hostname,
    path: pathname,
    port:port,
    headers: {
      Accept: 'application/json'
    }
  };

  const res = await get(options);

  if (res.statusCode === 200) {
    return bufferStream(res).then(JSON.parse);
  }

  if (res.statusCode === 404) {
    return null;
  }

  const content = (await bufferStream(res)).toString('utf-8');

  log.error(
    'Error fetching info for %s (status: %s)',
    packageName,
    res.statusCode
  );
  log.error(content);

  return null;
}

async function fetchVersionsAndTags(packageName, log) {
  const info = await fetchPackageInfo(packageName, log);
  return info && info.versions
    ? { versions: Object.keys(info.versions), tags: info['dist-tags'] }
    : null;
}

/**
 * Returns an object of available { versions, tags }.
 * Uses a cache to avoid over-fetching from the registry.
 */
export async function getVersionsAndTags(packageName, log) {
  const cacheKey = `versions-${packageName}`;
  const cacheValue = cache.get(cacheKey);

  if (cacheValue != null) {
    return cacheValue === notFound ? null : JSON.parse(cacheValue);
  }

  const value = await fetchVersionsAndTags(packageName, log);

  if (value == null) {
    cache.set(cacheKey, notFound, 5 * oneMinute);
    return null;
  }

  cache.set(cacheKey, JSON.stringify(value), oneMinute);
  return value;
}

// All the keys that sometimes appear in package info
// docs that we don't need. There are probably more.
const packageConfigExcludeKeys = [
  'browserify',
  'bugs',
  'directories',
  'engines',
  'files',
  'homepage',
  'keywords',
  'maintainers',
  'scripts'
];

function cleanPackageConfig(config) {
  return Object.keys(config).reduce((memo, key) => {
    if (!key.startsWith('_') && !packageConfigExcludeKeys.includes(key)) {
      memo[key] = config[key];
    }

    return memo;
  }, {});
}

async function fetchPackageConfig(packageName, version, log) {
  const info = await fetchPackageInfo(packageName, log);
  return info && info.versions && version in info.versions
    ? cleanPackageConfig(info.versions[version])
    : null;
}

/**
 * Returns metadata about a package, mostly the same as package.json.
 * Uses a cache to avoid over-fetching from the registry.
 */
export async function getPackageConfig(packageName, version, log) {
  const cacheKey = `config-${packageName}-${version}`;
  const cacheValue = cache.get(cacheKey);

  if (cacheValue != null) {
    return cacheValue === notFound ? null : JSON.parse(cacheValue);
  }

  const value = await fetchPackageConfig(packageName, version, log);

  if (value == null) {
    cache.set(cacheKey, notFound, 5 * oneMinute);
    return null;
  }

  cache.set(cacheKey, JSON.stringify(value), oneMinute);
  return value;
}

/**
 * Returns a stream of the tarball'd contents of the given package.
 */
export async function getPackage(packageName, version, log) {
  const tarballName = isScopedPackageName(packageName)
    ? packageName.split('/')[1]
    : packageName;
  const tarballURL = `${npmRegistryURL}/${packageName}/-/${tarballName}-${version}.tgz`;

  log.debug('Fetching package for %s from %s', packageName, tarballURL);

  const { hostname, pathname,port } = url.parse(tarballURL);
  const options = {
    hostname: hostname,
    path: pathname,
    port:port
  };

  const res = await get(options);

  if (res.statusCode === 200) {
    const stream = res.pipe(gunzip());
    // stream.pause();
    return stream;
  }

  if (res.statusCode === 404) {
    return null;
  }

  const content = (await bufferStream(res)).toString('utf-8');

  log.error(
    'Error fetching tarball for %s@%s (status: %s)',
    packageName,
    version,
    res.statusCode
  );
  log.error(content);

  return null;
}
修改npm.js完毕之后,执行npm run build重新生成server.js文件,然后启动服务:npm run start;
现在私库和公网npm都可以正常预览了
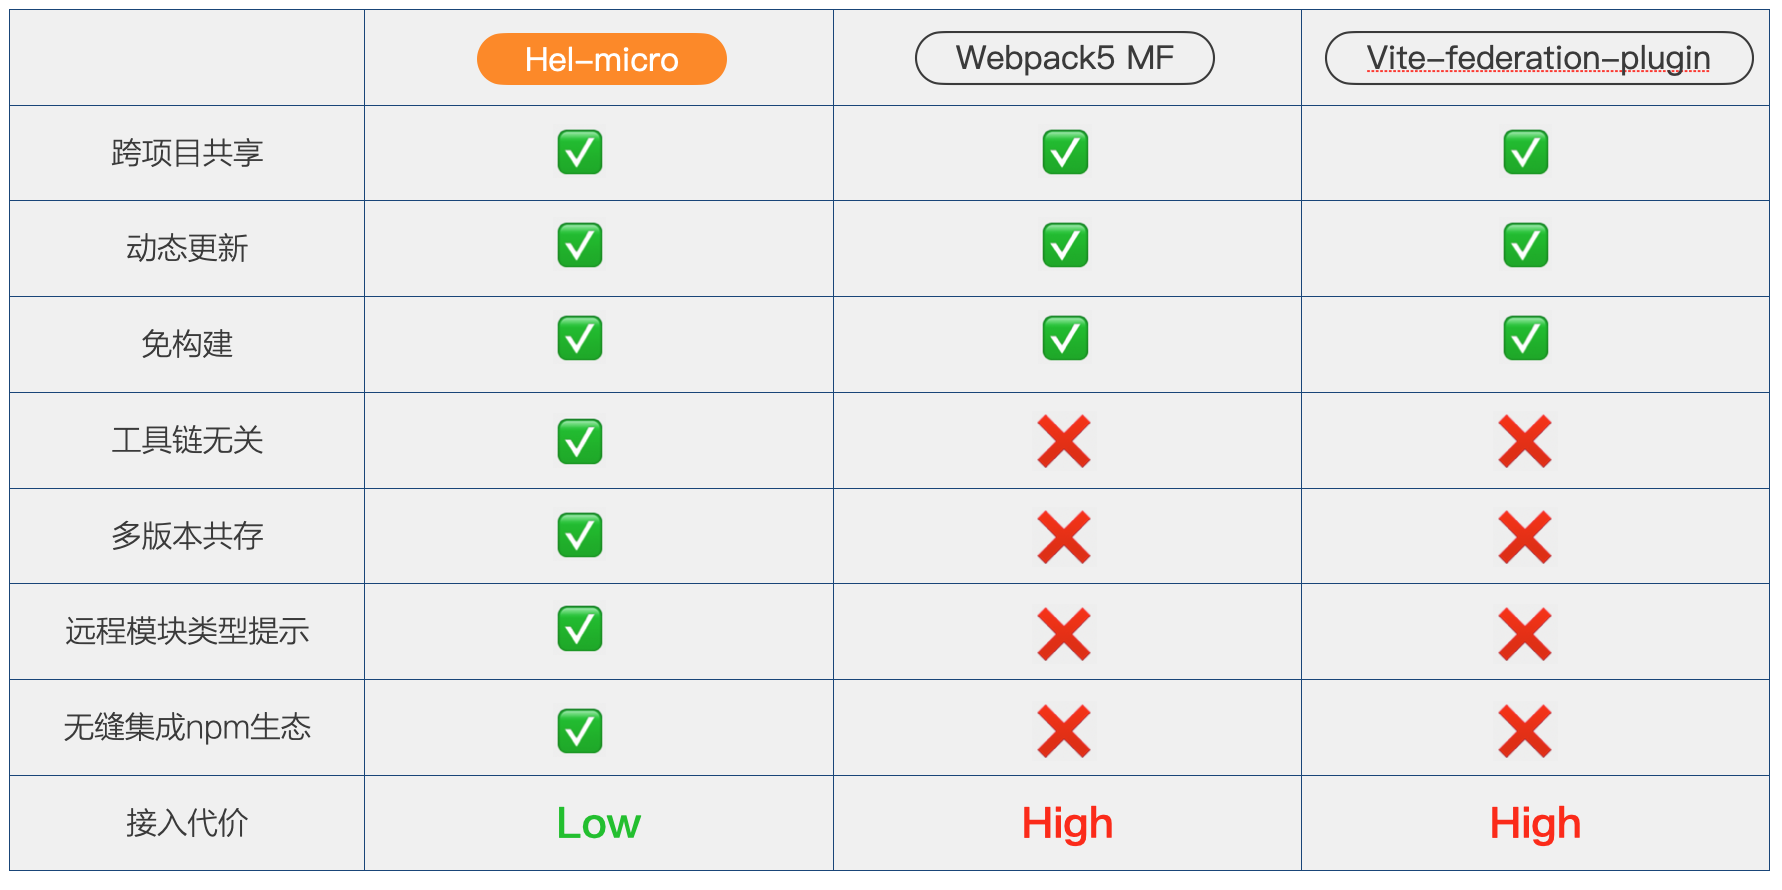
Hel-micro
文档地址: https://tnfe.github.io/hel/
具体不详细说明啦,请参照作者文档使用
接下来说一下Hel-micro + npm私服 + unpkg服务的一个落地实践
假设我有A、B两个业务系统,那么A与B既是模块的使用者又是模块的提供者,既是0又是1??
oh~有点复杂,我们先说0 1的情况吧,明白了0 1,1 0的相互转化也就为所欲为啦~
A系统 => 模块提供者
B系统 => 模块消费者
我们现在把作者提供的远程组件书写方法集成到了A系统,目前是直接放到了src下
远程组件的书写方式可参照上边的文档连接
A系统暴露的远程模块书写成功后,我们执行下如下命令
HEL_APP_HOME_PAGE=http://10.250.4.121:9999/[email protected]/hel_dist npm run build
- HEL_APP_HOME_PAGE是Hel-micro的参数
- http://10.250.4.121:9999是unpkg私服的地址
- [email protected]是包名称与版本号,都要跟package.json保持一直
打包完成后,执行发布命令
npm publish
注意用nrm检查下是否已经切换到自己私有的npm源了
发布成功后,我们就可以在任意项目里面消费远程组件啦,包括在A项目
消费方式
假设我们要在B系统消费刚才A系统产生的模块,我们只需要修改一点点地方即可
hel-micro
npm i note-comps
import { preFetchLib } from 'hel-micro'

;(async function() {
  // await preFetchLib('hel-tpl-remote-vue-comps');

  // 自定义前缀
  await preFetchLib('note-comps', {
    apiPrefix: 'http://10.250.4.121:9999'
  })

  // 调试本地开发中的远程组件
  // const enableCustom = !!window.location.port;
  // await preFetchLib('hel-tpl-remote-vue-comps', {
  //   custom: {
  //     host: 'http://localhost:7001', // 基于 web-dev-server 开发中生成产物联调
  //     // host: 'http://localhost:9001', // 基于 http-server 已构建好的产物联调
  //     enable: enableCustom,
  //   },
  // });

  import('./loadApp')
})().catch((err) => {
  console.error('loadApp err: ', err)
})
http://10.250.4.121:9999是我们搭建的unpkg私服的地址
- loadApp.js就是之前main.js里面的内容
import Vue from 'vue'

import App from './App'
import store from './store'
import router from './router'
// import * as Sentry from '@sentry/vue'
// import { BrowserTracing } from '@sentry/tracing'
import i18n from './lang'

import WujieVue from 'wujie-vue2'

Vue.mixin(mixins)
Vue.use(CzUI, {
  size: 'small',
  i18n: (key, value) => i18n.t(key, value)
})

Vue.use(WujieVue)

// 预加载流程引擎和权限引擎
const { setupApp, preloadApp } = WujieVue

new Vue({
  el: '#app',
  router,
  store,
  i18n,
  render: (h) => h(App)
})
<template>
  <div class="user-info">
    <div>
      <RemoteComp name="我是子模块" msg="子模块随时更新、部署驱动开发" />
    </div>
  </div>
</template>

<script>
import comps from 'note-comps'
export default {
  name: 'UserInfo',
  components: {
    RemoteComp: comps.Card // hi, remote component
  }
}
</script>
至此,A系统的模块更新后发布后,其他系统的这个模块都会自动更新,那么B系统也可以随意往外暴露各种远程模块给各个系统调用啦。
此时模块联邦就可以在不同系统中随意调度,但是还缺乏一个管控平台
目前我们是微模块 + 微前端配合食用的,具体食用方式,我们还会再出一篇文章详细介绍。
documentation


![[feature] 针对国内用户提供 gitee 源备份](https://avatars.githubusercontent.com/u/9958583?v=4)


![[MF vs hel-micro] Why is hel-micro a better implementation of module federation](https://avatars.githubusercontent.com/u/7334950?v=4)


 2 Nov 29, 2022
 14 Nov 28, 2022
 3 May 18, 2022
 4 May 3, 2022
 14 Jan 3, 2023
 263 Dec 27, 2022
 4 Nov 7, 2022
 10 Dec 15, 2022
 184 Dec 21, 2022
 47 Oct 17, 2022
 10 Sep 30, 2022
 243 Jan 8, 2023
 6 Jul 23, 2022
 57 Dec 28, 2022
 1.4k Jan 3, 2023
 6 Jul 19, 2022
 45 Dec 2, 2022
 23 Dec 26, 2022
 3 Feb 13, 2022