sanity-plugin-tags
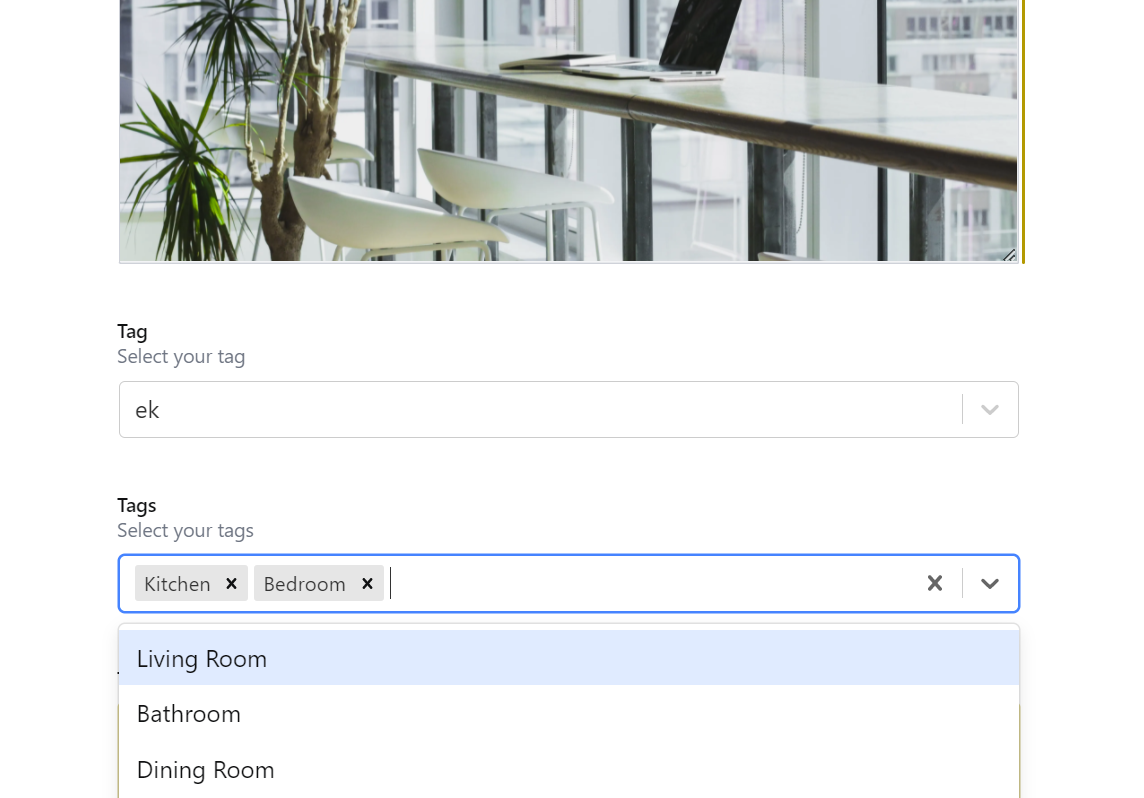
A multi-tag input for sanity studio. Fully featured with autocomplete capabilities, live updates, predefined tag options, style and component customizability, and much more.
Install
sanity install tags
Use
No configuration necessary! Simply use 'tag' or 'tags' as a type (single or multi select respectively) in your fields. If you want autocompletion, set the includeFromRelated option to the name of your field.
That's it! It will even update the autocompletion list live as changes are made to other documents!
Dive into the Options Section for more advanced use cases like predefined tags and the onCreate hook.
{
  name: 'myTags',
  title: 'Tags',
  type: 'tags',
  options: {
    includeFromRelated: 'myTags'
    ...
  }
}
Options
{
  name: string,
  type: "tags" | "tag",
  options: {
    predefinedTags?: Tag | Tag[] | () => Tag[] | Tag | () => Promise<Tag[] | Tag>
    includeFromReference?: false | string
    includeFromRelated?: false | string
    customLabel?: string
    customValue?: string
    allowCreate?: boolean
    onCreate?: (inputValue: string) => Tag
    reactSelectOptions?: {
      [key: string]: any
    }
  },
  //... all other Sanity Properties
},
What is a Tag?
A tag is simply an object with a label and value. Example:
{
  "label": "My Tag",
  "value": "my-tag"
}
This can be used for all sorts of things: categorization, single select, and much more. Essentially, if you want to limit people to a single or multi list of strings, tags will fit your use case perfectly.
predefinedTags
default: []
This option allows you to add any tags that you would like to the autocomplete list. This can take any form from a single tag to an array of tags, to a function that dynamically returns a tag or tags.
{
  // ...
  predefinedTags: { label: "My Tag", value: 'my-tag' }
  // ...
}
{
  // ...
  predefinedTags: [
    {label: 'My Tag 1', value: 'my-tag-1'},
    {label: 'My Tag 2', value: 'my-tag-2'},
  ]
  // ...
}
{
  // ...
  predefinedTags: async () => client.fetch(...)
  // ...
}
includeFromReference
default: false
If you already have a sanity schema that contains a tag-like structure and want to add them to the autocomplete list, set this option to the name of your sanity schema document. This option applies no filters. If you would like to filter, use the predefinedTags option.
{
  // ...
  includeFromReference: 'category'
  // ...
}
includeFromRelated
default: false
This option is similar to includeFromReference, but it allows you to add to the autocomplete list from a field in the related document. Typically, you would set this option to the name of the current field to allow autocompletion for tags that were already selected previously.
{
  // ...
  includeFromRelated: 'category'
  // ...
}
customLabel
default: 'label'
If you want to change the label key for your tags, set this option. Useful when you want to use the default label key to store some other value.
Note: If you set this option, all tags specified by predefinedTags and the structure returned by onCreate must use this custom label
{
  // ...
  customLabel: 'myLabelKey'
  // ...
}
customValue
default: 'value'
If you want to change the value key for your tags, set this option. Useful when you want to use the default value key to store some other value.
Note: If you set this option, all tags specified by predefinedTags and the structure returned by onCreate must use this custom value
{
  // ...
  customValue: 'myValueKey'
  // ...
}
allowCreate
default: true
By default, new tags can be created inline from this input. If you implement the input with a reference, this does not work. See Parts for more information.
{
  // ...
  allowCreate: false
  // ...
}
onCreate
default: (value) => ({ [customLabel]: value, [customValue]: value})
If you want to edit the label or value of the tag when a new one is created before saving it, use this hook. You do not need to specify this property if you set customLabel or customValue and like the default value. If you do specify it, make sure it returns an object that contains the custom label key and the custom value key. This hook provides an easy solution for 'slugifying' the label.
{
  // ...
  onCreate: (value) => ({
    label: value,
    value: value.toLowerCase().replace(/\W/g, '-'),
  })
  // ...
}
reactSelectOptions
default: {}
The input component uses React Select under the hood. If you want to change and override any of the options passed to the select component, specify this option. Specify this option at your own risk!
If you want to override React Select's components see Parts for more information.
{
  // ...
  reactSelectOptions: {
    closeMenuOnSelect: false
  }
  // ...
}
Parts
part:tags/components/input
The main benefit of this plugin is its input component. To maximize its usefulness, you can import the Input component and use it elsewhere. If you already have a Tag document and want to create tags by reference rather than by object, you could add a field that uses this as an input component.
import Input from 'part:tags/components/input'

export default {
  name: 'my-tag-select',
  title: 'Select your Tags',
  type: 'array',
  inputComponent: Input,
  of: [{type: 'reference', to: [{type: 'myTagDocument'}]}],
  options: {
    ...
  }
}
Note that if you do choose to do this, tags by reference are limited by the input component in that they do not support predefinedTags or allowCreate.
You can also implement this input component yourself if you would like.
part:tags/components/select
If you would like to specify custom components for React Select without having to rewrite the entire Input component specified by this plugin, implement this part and export an object containing each component. See React Select's documentation for more information.
The current implementation defines no custom components, so you lose no functionality by implementing this part yourself.
part:tags/schemas/tags-default
If you need to import the current tags schema, use this part.
part:tags/schemas/tag-default
If you need to import the current tag schema, use this part.
Contribute
I love feedback, and any help is appreciated! Feel free to install the plugin, submit an issue, or open a PR.
To install the plugin for development follow these steps:
- Clone the repository
cd sanity-plugin-tagsnpm installnpm linknpm run watch(this will begin building the plugin for development)- cd into the sanity studio that you will be using for testing
npm link sanity-plugin-tags- Add 'tags' to your sanity plugins inside your
sanity.jsonfile sanity start
That's it! Now any changes you make to the plugin will appear automatically in your sanity studio development environment as you work in it!
Acknowledgements
This plugin is based off of sanity-plugin-autocomplete-tags, though it enhances it by adding a couple additional options while improving support for default sanity values like initialValues and readOnly.


 3 May 18, 2022
 4 May 3, 2022
 14 Jan 3, 2023
 37 Sep 28, 2022
 103 Dec 16, 2022
 220 Nov 7, 2022
 24 Nov 29, 2022
 20 Oct 30, 2022
 13 Dec 30, 2022
 73 Dec 28, 2022
 4 Apr 4, 2022
 2 Jan 8, 2022
 1 Jan 22, 2022
 23 Nov 29, 2022
 23 Nov 16, 2022
 10 Nov 30, 2022
 159 Dec 30, 2022
 16 Nov 2, 2022