All code from this tutorial as a complete package is available in this repository. If you find this tutorial helpful, please share it with your friends and colleagues!
For more tutorials like this, follow me @eagleson_alex<script async src="https://platform.twitter.com/widgets.js" charset="utf-8"></script> on Twitter
Introduction
Like many other people out there, I have quite a few digital documents and pictures that are important to me.
Although I know I have at least one copy of these locally, and I do use Dropbox as cloud storage; I'll freely admit I don't meet the coveted 3-2-1 backup strategy standards
Over the holidays I received a new 4TB hard drive and with it, a renewed interest in backing up my data (at least the important stuff like pictures of my kids, and financial records. I guess in the worst case scenario, I could probably replace my Star Trek TNG blu-ray rips; so I'll keep those separate for now).
With that in mind, I decided to combine it with an exercise that dives a bit further than I usually go into the Node.js ecosystem.
This tutorial is the result of that exploration, and the result is a little tool for synchronizing backup copies of any directory on your machine. As a bonus we're going to configure it to support Linux, Mac and Windows.
This is one of those posts where the biggest beneficiary in many ways is myself. I wanted to try something new and simply documented my experience with learning. It follows @swyx's philosophy of learn in public and share what you've learned with the wider community so hopefully everyone can benefit.
That said, I should be very clear that this is primarily meant as a learning experience and is absolutely not meant to be the best backup solution.
If you're serious about remote storage then something like Google Drive will get the job done for you. For local backups setting up a RAID drive will cover your ass better than this little backup app will.
That said, those options are a lot less fun so if you're willing to use this as a learning opportunity to practice your Node.js skills, and get some bonus scheduled backups out of it, I think you'll find this to be a really interesting tutorial.
Table of Contents
- What You Will Learn
- Try it Out (Optional)
- Configuring Your Machine (Optional)
- Creating the Project
- Cross Platform Support
- Running as a Background Process
- Adding a Discord Webhook (Bonus)
- Wrapping Up
What You Will Learn
-
Common Linux tools like
rsync(copying files locally and over SSH),cron(scheduling tasks on a specific interval) andnohup(run something as a background process that doesn't stop when the terminal session is ended) -
Running Node (Javascript) apps as background processes, including automatic reboot on crash using
pm2, a production viable tool for Node.js servers. -
More about the different values available on the
processobject in Node.js includingtitleandplatform -
Create an app that behaves differently depending on which OS it's running on and works on both Bash (Mac/Linux) and Microsoft PowerShell (Windows)
-
Send messages to a webhook with HTTP POST requests, in our example that webhook will be a Discord bot
Try it Out (Optional)
If you want to try it out first, then follow the instructions below. If you want to jump into creating your own version, then skip this section.
This app will work on both Mac/Linux (Bash) and Windows (PowerShell).
All you need installed are git and nodejs.
- Clone the project from this repository
- Run
npm installfrom the project directory - Create a
.envfile in the root with the following structure:
SOURCE_DIR="example-source/"
DESTINATION_DIR="example-destination/"
CRON_STRING="* * * * * *"
WEBHOOK_ID="DISCORD_WEBHOOK_ID"
Update SOURCE_DIR to be the directory you want to copy, and DESTINATION_DIR where you want to synchronize.
Edit CRON_STRING to determine the schedule the copying occurs on. If you are not familiar with cron strings use this tool to help you create one.
The DISCORD_WEBHOOK_ID is optional. If you don't use it it will not impact the app. If you do use it you remove the https://discord.com/api/webhooks/ portion of the webhook URLm the remainder is the DISCORD_WEBHOOK_ID.
- Run the app with
node backup.js.
If you plan to run it as a long-term background process you can use PM2 which is described in the Running as a Background Process section.
Configuring Your Machine (Optional)
(Note: if you already have a machine and folders that you want to use for your backups setup, then you can skip this step entirely. All we are going to cover in this section is setting up Ubuntu Linux on an old laptop, configuring it to run 24/7, and using SSH so that we can access and manage it remotely from other machines on our home network)
I'll be using this little blue Dell Inspiron with a whopping 2GB of RAM sitting around collecting dust.

Honestly it's a great machine with an SSD inside of it, unfortunately it's just too bottlenecked by its 2GB of RAM, and there is no way to upgrade it (I've tried).
So for that reason I haven't been able to get much use out of it, but that changes now.
I began by following this tutorial for installing Ubuntu with a USB stick and got the little laptop up and running with the latest Ubuntu.
Next I needed to make sure I could access the laptop from the terminal on my main machine. That will be done over SSH so I followed this tutorial on enabling SSH on Ubuntu. Afterwards I confirmed I could successfully SSH into the laptop from my machine.
Next I need to make sure that both git and node are installed on the machine, so that I can clone my project and run it. Fortunately git comes by default with Ubuntu and I can installed node with:
sudo apt update
sudo apt install nodejs
If this gives you any trouble just follow this tutorial.
Next I plug in my external hard drives that I am going to be using as backups. When I create my app I'll be pointing from one directory on one hard drive to another directory on the other hard drive to sync each week.
Lastly I need to do a bit of housekeeping for the laptop to make sure it stays running and knows what to do when the lid is closed.
To keep it from sleeping it's as simple as Settings -> Power and turn off Automatic Suspend. Basically disable anything that reads as if it will put your machine to sleep.
Next I need to deal with what happens when I close the lid. Unfortunately I don't see anything about that in Power settings so I need to edit the config file directly:
sudo gedit /etc/systemd/logind.conf
And change the following value from the default to ignore:
HandleLidSwitch=ignore
If it is commented out (prefixed with #) then remove the # and save.
That's it! I can now take the machine, close the lid and set it up in a nice cool area with the external drives attached ready to run all the time. Ideally you should plug it into your router directly with ethernet to minimize wifi issues, however the laptop I have unfortunately has no ethernet, so I'll need to settle for wifi.
Creating the Project
Let's create a directory and initialize our Javascript project inside of it:
npm init -y
Next we install the three dependency libraries for the project:
npm install cron rsync dotenv
Here's what each one is used for:
-
cron: Will allow us to schedule the backup at specific intervals. This package uses a Javascript implementation of the cron syntax and not the actual cron daemon meaning we don't need to worry about OS compatibility issues with this package.
-
rsync: This will handle the copying and syncing of files for us. This package does use the actual
rsyncprogram installed on the user's machine so we will have to manage compatibility within our Node.js app for this one. -
dotenv: Allows us to read
.envfiles from our project directory. This will let us include our personal directory paths and also our private Discord webhook without sharing that data in the git repo. Users who clone the project can provide their own values.
We'll create a Javascript file called backup.js and get the absolute basics working:
backup.js
const CronJob = require("cron").CronJob;
const Rsync = require("rsync");

// Equivalent to writing `rsync -a example-source/ example-destination/` on terminal
rsync = new Rsync()
  // The -a flag means "archive" to say we are copying the full directory not just a file
  .flags("a")
  .source("example-source/")
  .destination("example-destination/");

const job = new CronJob(
  // Run this function once every minute
  // To learn more about this cron string visit the below link
  // https://crontab.guru/#*_*_*_*_*
  "* * * * *",
  () => {
    rsync.execute((error, code, cmd) => {
      // List of rsync status codes
      // https://stackoverflow.com/a/20738063
      console.log("backup completed with status code: " + code);
    });
  },
  null,
  true,
  // Replace with your time zone
  // https://gist.github.com/diogocapela/12c6617fc87607d11fd62d2a4f42b02a
  "America/Toronto"
);

// Begin the cronjob
job.start();
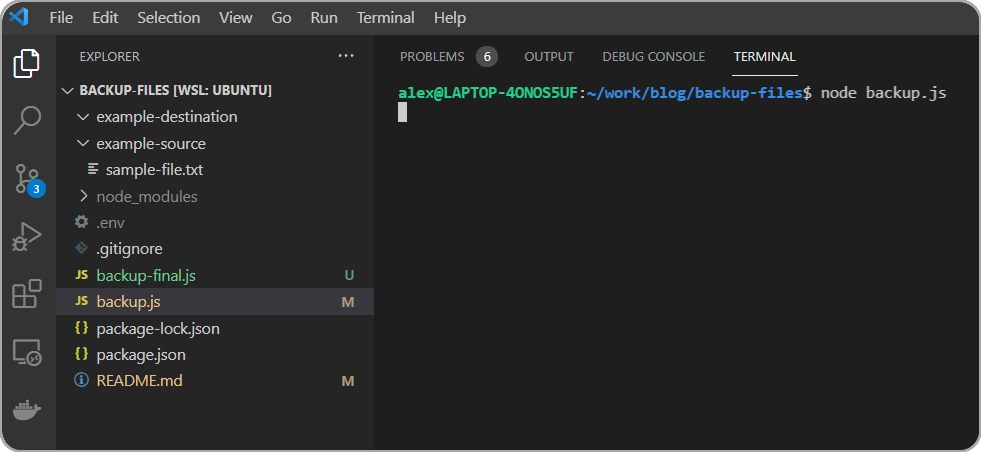
Also create directories called example-source and example-destination. Inside example-source create a TXT file inside called sample-file.txt with any content inside that file you like. Doesn't matter what it is, it's just used to confirm our backup is working.
Here's what things look like before the script has been run (note the empty example-destination directory):
After the script has run once:
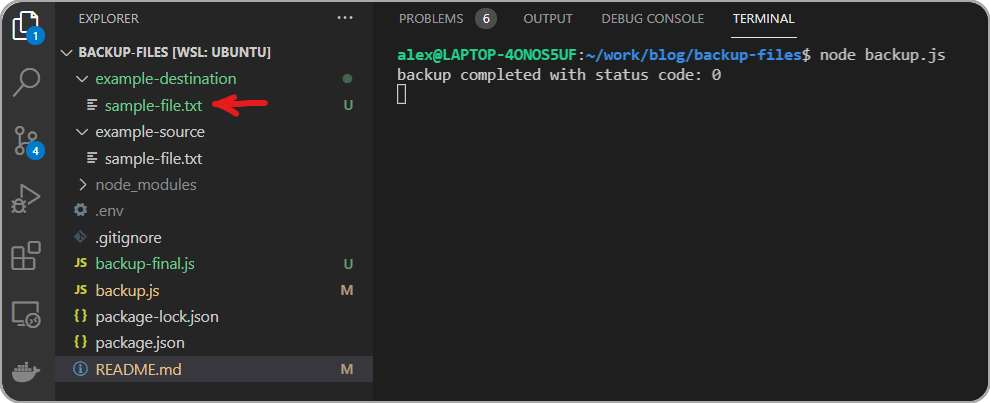
Things are looking good, we have a once-every-minute interval backup of our example-source directory to our example-destination directory.
At this point you could replace those directory strings with whatever folders you like and create a regular directory backup system on your machine.
Let's make it easier to customize for those who are downloading and using our tool by adding dotenv package to read .env files as part of the configuration.
If you've already followed the tutorial you have the dotenv package installed with NPM so it's just a matter of importing it. Before we do let's create the .env file. Make sure to note that is .env with a starting . (to indicate hidden files):
.env
SOURCE_DIR="example-source/"
DESTINATION_DIR="example-destination/"
CRON_STRING="* * * * *"
Now we can update our code to read from that file. We just have to require the dotenv package at the top of our code:
backup.js
require("dotenv").config();
const CronJob = require("cron").CronJob;
const Rsync = require("rsync");

// Equivalent to writing `rsync -a example-source/ example-destination/` on terminal
rsync = new Rsync()
  // The -a flag means "archive" to say we are copying the full directory not just a file
  .flags("a")
  // Reads from the `.env` file in the project directory
  .source(process.env.SOURCE_DIR)
  .destination(process.env.DESTINATION_DIR);

const job = new CronJob(
  // Run this function once every minute
  // To learn more about this cron string visit the below link
  // https://crontab.guru/#*_*_*_*_*
  process.env.CRON_STRING,
  () => {
    rsync.execute((error, code, cmd) => {
      // List of rsync status codes
      // https://stackoverflow.com/a/20738063
      console.log("backup completed with status code: " + code);
    });
  },
  null,
  true,
  // Replace with your time zone
  // https://gist.github.com/diogocapela/12c6617fc87607d11fd62d2a4f42b02a
  "America/Toronto"
);

// Begin the cronjob
job.start();
When we run node backup.js again we get the same result, but this time our source and destination directories are being read from the .env file. This will make it easier for users to add their own source/destination directories and cron string when they download the tool.
It also improves privacy as we will be adding .env to our .gitignore file so the directories that I choose to copy on my machine will not be included in the git repository for this project.
In fact, let's do that now. If you're creating this project for yourself you'll want to be able to commit it to your remote git host, so run:
git init
Then create a .gitignore file in the root directory with:
.gitignore
node_modules
.env
nohup.out
We exclude .env for reasons mentioned above, and node_modules since it will be re-created by running npm install for anyone who uses our project. The last one nohup.out will contain some logs later in the tutorial that we don't need to share with others, so we're just adding it now in advance.
Excellent! You now have a great little tool that works on Linux and Mac... but what about Windows?
The truth is, basically all the development work I do is in a Linux environment.
Even though I do all my daily development on Windows 11 with WSL2 I'm still doing everything inside a native installing of Ubuntu despite logging into Windows each day.
I honestly don't even know how to use Windows cmd or PowerShell beyond the DOS commands I still remember from when I was a kid (dir?)... but if the majority of my personal stuff (photos and documents) are stored on Windows, maybe this is a good opportunity for me to learn?
I like learning new things! I challenge myself: what do I need to do to get this working on Windows?
Turns out it was surprisingly easy.
Cross Platform Support
Most of our app will work fine on Windows as-is, the big challenge here is rsync.
As you can see from that link, rsync is a Unix copying tool that will be natively available on most Linux and mac environments; but not Windows.
The rsync package on NPM is simply a wrapper around the tool installed on your OS, so running our backup.js in PowerShell gives us an error. The error is that the rsync program does not exist.
Here's the really cool thing though: not only does Windows have a very similar tool with a similar API called robocopy, the rsync NPM package allows us to chain a method called executable() that takes a string.
That string is the name of the copying tool we want to use.
It defaults to rsync, but we can provide it with any name we want.
We can check what OS the program is running on with process.platform which will return win32 as a string when running on Windows.
Let's update backup.js:
backup.js
require("dotenv").config();
const CronJob = require("cron").CronJob;
const Rsync = require("rsync");

// The value of process.platform will be:
// Windows: win32
// Mac: darwin
// Ubuntu: linux
const syncProgram = process.platform === "win32" ? "robocopy" : "rsync";

// Equivalent to writing `rsync -a example-source/ example-destination/` on terminal
rsync = new Rsync()
  .executable(syncProgram)
  // The -a flag means "archive" to say we are copying the full directory not just a file
  .flags("a")
  // Reads from the `.env` file in the project directory
  .source(process.env.SOURCE_DIR)
  .destination(process.env.DESTINATION_DIR);

const job = new CronJob(
  // Run this function once every minute
  // To learn more about this cron string visit the below link
  // https://crontab.guru/#*_*_*_*_*
  process.env.CRON_STRING,
  () => {
    rsync.execute((error, code, cmd) => {
      let result;
      if (error) {
        // List of rsync status codes
        // https://stackoverflow.com/a/20738063
        result = `Code ${code} ${error?.message}`;
      } else {
        result = "Backup complete";
      }

      const currentDate = new Date().toISOString();
      // Write log to the console, or will be redirected to a
      // nohup.out file if using nohup
      process.stdout.write(`${currentDate}: ${result}\n`);
    });
  },
  null,
  true,
  // Replace with your time zone
  // https://gist.github.com/diogocapela/12c6617fc87607d11fd62d2a4f42b02a
  "America/Toronto"
);

// Begin the cronjob
job.start();
Notice the changes above. I did a check against process.platform and if it returns win32 we set the executable copy program to robocopy instead of rsync which will allow it to run on Windows.
Lucky for us the syntax for robocopy is exactly the same as rsync:
robocopy <source> <destination>
This means we don't have to change anything else about the way our program already works, the rsync package will call robocopy exactly the same way when we're on Windows.
We're ready to try it out. In order to get the project files on Windows, I'm going to push them to Github and then clone them on by Windows filesystem.
So here's what I do: I push this project to Github. Then I open PowerShell.
(I am a PowerShell noob, but I'm doing my best.)
Turns out I don't even have git or node installed on Windows so I'm not going to get very far here.
First I need to download git so I can clone the project, then I need to download node so I can run it.
Once downloaded and installed I can run both these commands in PowerShell and get valid output:
PS C:\Users\ME> git --version
git version 2.34.1.windows.1

PS C:\Users\ME> node --version
v16.13.1
Now that everything is set I can git clone MY_PROJECT_URL and then cd into that directory and run:
npm install
Before I can run the project though I need to create the .env file since I did not include it in the repo for privacy reasons:
.env
SOURCE_DIR="example-source/"
DESTINATION_DIR="example-destination/"
CRON_STRING="* * * * *"
Finally now in PowerShell in the project directory i run:
node backup.js
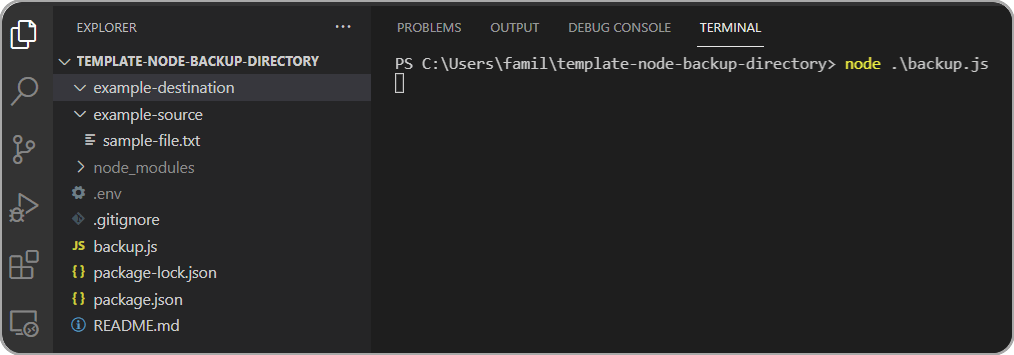
And my result:
Before the script has been run on Windows (note the empty example-destination directory)
After the script has run once on Windows:
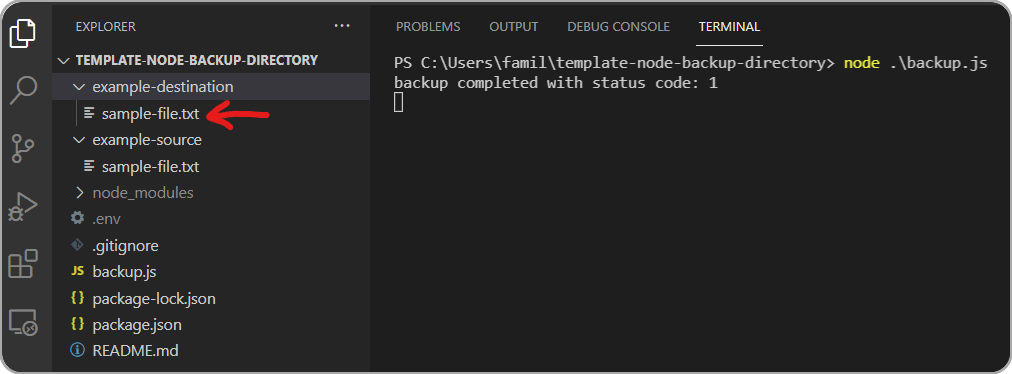
Note the status code doesn't necessarily match up with the rsync status codes, but the result is correct: the copying process was successful.
So that's really cool. You now have a tool that will copy the contents of one directory to another on an interval of your choice. Right now we have it setup to run every minute which is pretty overkill, but thanks to tools like crontab guru it's easy to create exactly the interval you want.
For example I only need to backup my directory once a week, so I'm going to set it to run at 3am every Sunday.
We now have a backup process that runs on a schedule and works on Linux, Mac and Windows!
But... how are we going to keep this running all the time?
If we simply use node backup.js the process is going to stop as soon as we close our terminal. We need this process to be running in the background, ideally 24/7.
We are going to need a better solution. Enter pm2
Running as a Background Process
Before we get into our final solution using pm2, I'd like to quickly show Mac/Linux users how you can get this to work without installing any addition tools at all using nohup.
You can skip this section on nohup if you like and go right to the final solution using PM2 if you like, it's just here to give you a bit of a deeper insight on how to create background processes using native Unix tools.
Using nohup (Optional - Mac and Linux Only)
You can find out if you system supports nohup with:
nohup --version
$ nohup --version
nohup (GNU coreutils) 8.30
If you get a version number successfully, then this next step should work for you.
nohup node backup.js &
The leading nohup will tell your system that even when your session ends you don't want the process to stop, and the final trailing & symbol means to run it as a background daemon process.
You will likely get an output that looks like:
[1] 7604
After running the command. This is the process ID of your node program. If for any reason you lose track of it you can find it again with this command:
pstree -p
You'll get output showing all the processes running on your system with their IDs. If you notice in the backup.js code example above we used process.title and gave it a string value of node-backup-script.
This helps find and identify the process ID when we use the pstree -p command:
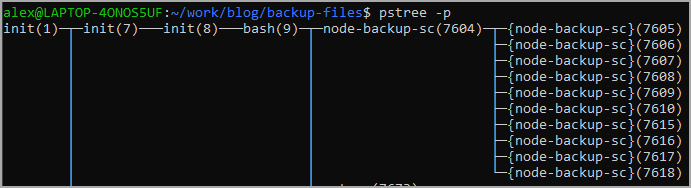
Notice the node-backup-sc(7604) in there showing the same PID that we were given when the script started, and also the title value we set with process.title to make it easier to find and identify.
Since we can no longer simply ctrl+C to cancel the node script execution, we have to do something different. We have to kill the process by referencing the PID directly.
To do that you can run:
kill -9 YOUR_PID
Where YOUR_PID is the ID that is given on your machine. In my example above it's 7604. The -9 tells it to override anything that might stop or intercept a system kill signal, you want to end the program no matter what.
So the nohup option will work will for Unix systems that support it as long as they are running 24/7, the process will keep running. There are a couple of issues with it though:
- If your program crashes,
nohupwill not reboot it - This solution is Unix specific and will not work on Windows
So how do we create a solution that will run 24/7, will reboot on crash, and supports cross-platform?
That's what pm2 is for.
Using PM2 (All Platforms)
npm install -g pm2
This command will work on any OS that has NPM installed (Linux, Mac or Windows). After installing you'll be able to verify it is available with:
pm2 --version
To begin the process just run:
pm2 start backup.js

So now the process is running in the background and will keep running even if you close your terminal, and will reboot on crash.
You can view the running process anytime with pm2 list and you can stop it with pm2 stop backup where "backup" is the name of the process.
You can also view the logs of your app by running pm2 logs backup. You'll get an output that looks like:
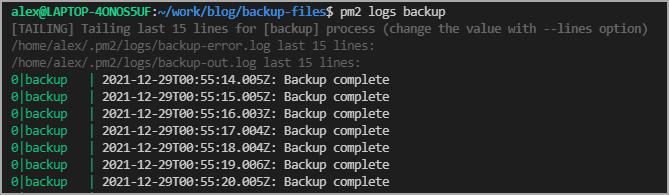
Unfortunately this will not survive a full system reboot. Configuring pm2 to start with your app automatically on reboot is beyond the scope of this tutorial, but there are very good instructions on how to handle it if you would like to do.
Here's for Unix based systems and Windows.
You can now keep this running on an old laptop, or on your own cloud server like a $5 monthly Digital Ocean Droplet for example.
Just be careful when looking at Node app hosting solutions, there are a lot of options out there, but the majority of free ones (Heroku for example) will put your app to "sleep" sometimes, which isn't a viable option as it must be awake when the scheduled backup triggers in order to work properly.
Lastly we'll add a little bonus tutorial showing how to use webhooks to send the status output of our backups to a Discord bot so that we can keep track of it easily.
Adding a Discord Webhook (Bonus)
Start by creating your webhook bot on your server. Follow this tutorial up to the end of the section called Making a Webhook. Stop when you get to Quick Example: GitHub Webhook Integration.
All you need is to get to the point where you can click the button that says "Copy Webhook URL". It will look like:
https://discord.com/api/webhooks/YOUR_WEBHOOK_ID
Where YOUR_WEBHOOK_ID is a long string of characters which may include additional slashes. Basically everything after the https://discord.com/api/webhooks/ you want to copy and paste into the WEBHOOK_ID key in your .env file.
.env
SOURCE_DIR="example-source/"
DESTINATION_DIR="example-destination/"
CRON_STRING="* * * * * *"
WEBHOOK_ID="YOUR_WEBHOOK_ID"
Next we'll update backup.js:
backup.js
require("dotenv").config();
const CronJob = require("cron").CronJob;
const Rsync = require("rsync");
const https = require("https");

process.title = "node-backup-script";

// Will be true if there is a Discord WEBHOOK_ID set in the `.env` file
const useDiscord = !!process.env.WEBHOOK_ID;

const options = {
  hostname: "discord.com",
  path: `/api/webhooks/${process.env.WEBHOOK_ID}`,
  method: "POST",
  headers: {
    "Content-Type": "application/json",
  },
};

// process.platform will be:
// Windows: win32
// Mac: darwin
// Ubuntu: linux
const syncProgram = process.platform === "win32" ? "robocopy" : "rsync";

// Equivalent to writing `rsync -a example-source/ example-destination/` on terminal
rsync = new Rsync()
  .executable(syncProgram)
  // The -a flag means "archive" to say we are copying the full directory not just a file
  .flags("a")
  // Reads from the `.env` file in the project directory
  .source(process.env.SOURCE_DIR)
  .destination(process.env.DESTINATION_DIR);

const job = new CronJob(
  // Run this function once every minute
  // To learn more about this cron string visit the below link
  // https://crontab.guru/#*_*_*_*_*
  process.env.CRON_STRING,
  () => {
    rsync.execute((error, code, cmd) => {
      let result;
      if (error) {
        // List of rsync status codes
        // https://stackoverflow.com/a/20738063
        result = `Code ${code} ${error?.message}`;
      } else {
        result = "Backup complete";
      }

      const currentDate = new Date().toISOString();
      // Write log to the console, or will be redirected to a
      // nohup.out file if using nohup
      process.stdout.write(`${currentDate}: ${result}\n`);

      // Only sends the request if WEBHOOK_ID is defined
      if (useDiscord) {
        // Send the request to Discord with the configured options
        const req = https.request(options, (res) => {
          // do nothing with Discord response
        });

        // Discord requires a { content: string } shape for posting messages
        req.write(
          JSON.stringify({
            content: result,
          })
        );

        req.end();
      }
    });
  },
  null,
  true,
  // Replace with your time zone
  // https://gist.github.com/diogocapela/12c6617fc87607d11fd62d2a4f42b02a
  "America/Toronto"
);

// Begin the cronjob
job.start();
Presuming you set up your webhook bot correctly, you will see it post a message on your Discord channel with the status of the backup every time the cron job fires.

You can use this as a convenient way to see the log output without having to log into your server and check manually. If there is an error, the Discord bot will print the error message. For example if I change the source to a folder that does not exist:

I can lookup the status code to get more information about the problem.
So we've now handled all of the major features required for this project!
- Creating a backup of one directory to another
- Support for scheduled times of backups
- Cross platform support
- Communication of success/error (either through PM2 logs or Discord)
Wrapping Up
I hope you learned something new from this tutorial, I know it was kind of a hodge-podge of different concepts, but that was a big part of the idea. One of my favourite ways of learning new things is to connect existing skills and tools in interesting ways.
Please check some of my other learning tutorials. Feel free to leave a comment or question and share with others if you find any of them helpful:
For more tutorials like this, follow me @eagleson_alex<script async src="https://platform.twitter.com/widgets.js" charset="utf-8"></script> on Twitter.


 13.4k Jan 4, 2023
 14 Jan 2, 2023
 7 Sep 13, 2022
 1.7k Jan 3, 2023
 21.1k Dec 30, 2022
 553 Nov 21, 2022
 682 Dec 29, 2022
 126 Dec 26, 2022
 23 Nov 24, 2022
 19 Jan 2, 2023